At the last domain meeting, a Gangrel – for no reason at all, of course! – mauled you. With our Quick’n’Dirty Tutorial, you could apply the claw wounds in two minutes during the session and continue playing directly.
But now you have a little more time and can make up even more beautiful wounds before the game with a little more effort. You need a bit more tools, but the result is damn good. Fortunately, it’s not really difficult, and the things aren’t expensive either.
You need

– latex milk
– a small glass bowl
– lipliner (bright red)
– kajal pencil or dark brown pencil for eyebrows
– lipliner in light and/or dark pink
– tweezers
– nail scissors
– Q-tips
– fake blood
Note on latex milk: I have had the best experience with latex milk for making LARP weapons. You can buy latex in small tubes for Halloween – that stuff is horrible. At least with me, it was always lumpy and doesn’t dry properly. The latex milk for making weapons is only available in larger containers, but since you only need a small amount for wounds, it will last a very long time.
You can also use a brush instead of Q-tips. However, it’s a waste of time afterwards, which is why I prefer cotton swabs. You can just throw them away afterwards 😉
Lipliner and kajal don’t have to be expensive. The cheapest brand you can find in the drugstore will do.
Of course, you can also use theatre make-up. For my taste, it’s too much trouble and too expensive to buy theatre make-up especially for the occasional wound, when cheap lipliners work just as well.
Step 1: Draw the claw wounds
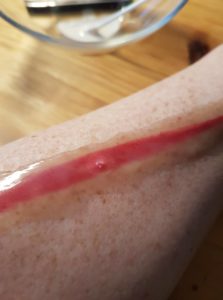
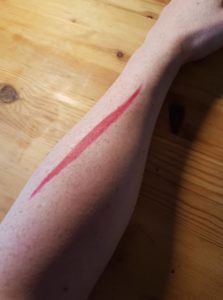 As with the Quick’n’Dirty method, we first draw where the claw wounds run with the lipliner. Don’t be squeamish, make bold red welts that are wider in the middle and pointed at the ends.
For the photos I only made up one claw wound because I was a bit lazy 😉
Step 2: Apply the latex
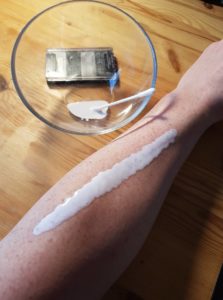 Here we go with the latex. Pour a small amount into the glass bowl and spread a thin layer with the Q-tip on the wounds you just painted. Apply the latex over a slightly larger area than the painted wound.
Attention: Latex milk stinks. This is normal and not harmful, but annoying. If you are sensitive, apply the make-up with the window open or outside.
A very small amount of latex is enough. On the photo, you can see how little I need for this one wound. To prevent this small amount from spreading all over the bottom of the bowl, I put the bowl on an eyeshadow box to prop it up.
Step 3: Let the latex dry well
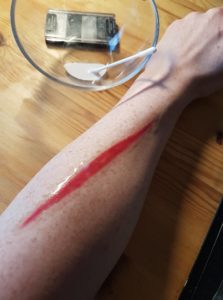 When the latex dries, it becomes transparent. Then you can apply the next layer until we are at a total of 3 layers. More layers are not optimal, because then the wound will not blend so well with the skin.
Unfortunately, I used 4 or 5 layers of latex for this series of pictures, which is why the final wound is not quite as beautiful as it could have been.
Step 4: Pinning the latex
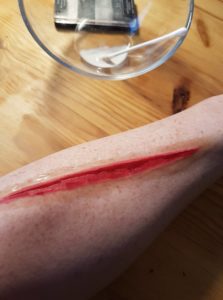
 Now comes the trick that makes the wound so great: We cut the latex layer along the claw wound. This gives the impression of torn skin.
Carefully pull up the latex with the tweezers and make a small hole. But do not pull too hard. The edges of the latex layer should remain on the skin.
Step 5: Cut open the latex
 Insert the nail scissors into this small hole and cut open the latex.
Be careful not to cut yourself! Especially if you have made up wounds on your face, make sure that no one bumps into you while you are working with the scissors near your eyes!
Step 6: Fringe the claw wounds
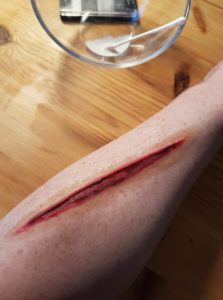
 A Gangrel claw makes horrible wounds – so we fray the edges of the wound. Carefully cut back the latex with the nail scissors. It can and should look irregular!
Step 7: Darken the wound
 Now take the kajal or eyebrow pencil and darken the claw wounds. Especially directly under the edge of the wound, the dark colour gives the whole wound more depth.
Don’t press on too hard. We want to make the red darker and add more structure through different shades, not paint on a black bar.
Step 8: Artificial blood and final touch
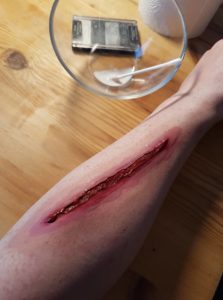 Finally, we add some fake blood to the wound. We also apply some make-up to the outside of the wound to make it look more real. With the pink lipliners we redden the area around the claw wounds a little so that it looks even more martial.
And here you can see directly why too much latex is not good: it takes on the colour differently, and therefore it doesn’t look totally convincing. My attempt to save it rather made it worse. But since you have to stand by it when things don’t work out (and since I didn’t want to start all over again), you can now see this only half-successful attempt. Besides, a golden rule of make-up for Vampire Live saves us: Nobody will see minor mistakes in the dark anyway 😉
When the claw wounds heal, there are different stages of healing. We will have at least one more tutorial on how to apply half-healed wounds.