You know how it is – you’re sitting at a meeting, unsuspectingly, chatting a bit, and suddenly you have a gangrel, or rather their claws, in your face. But what now? You don’t have to disappear into the mask for an hour and make up elaborate claw marks. After all, you have a few important things to do right now at the latest.
So that you have more than a bit of fake blood that you roughly smear on your body, this is a quick’n’dirty tutorial for quick claw marks. The result doesn’t look deceptively real, but it certainly looks good enough, especially in semi-darkness. The big advantages: You can do them in one to two minutes and the required material costs only ~5€ and fits in every lady’s (or men’s) handbag.
You need
 You only need three things for these quick claw marks:
– A red lip liner, definitely in a strong red colour
– A black eyeliner (alternatively a dark brown pencil for the eyebrows)
– fake blood
If you really have been hit in the face, you will of course need a mirror. Don’t worry, a hand mirror will do, because you can do your make-up one-handed.
Lipliner and eyeliner can be from the cheapest brand you can find in the drugstore.
I like to buy fake blood for Halloween in the small tubes you find everywhere in drugstores, at NanuNana, in supermarkets, or in 1€ shops. If you calculate it to a big canister, a small tube like this is very expensive, but therefore it does not take up much space in your pocket.
Make sure you get nice fake blood. Up until now, I have gotten everything from “light red transparent jelly” to “dark red and super liquid” to “medium red and thick”. Save yourself the trouble with jelly-like artificial blood, it’s no good. The ideal is artificial blood that is nice and dark and somewhat viscous.
Of course, you can also buy a large canister of fake blood and fill a small portion for yourself. You can find travel bottles for shampoo in the drugstore, into which you can easily fill a small portion of fake blood. A container with a spout is ideal for precise application, otherwise you might need a brush or Q-tip as an aid.
Get to the make-up
So, time is running. To collect yourself after this gruesome attack, retreat to the offplay area at the appropriate time and pull out your three make-up utensils.
Step 1: Mark the spot
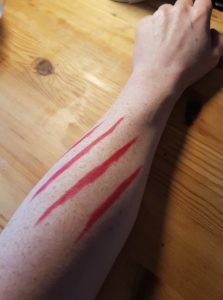 Take the lip liner and draw the basic shape of the claw marks. Don’t be squeamish, make the strokes nice and wide. You’ve just been shredded by monstrous, death-dealing claws, you want that to show this horror. Let the tips of these strokes taper to a point.
Depending on how big the paw was and how much space you have, don’t place the claws too close together. A few centimetres of space between the claws is good. Besides, it looks even more martial afterwards if the claw marks cover a large area.
Step 2: Create structure
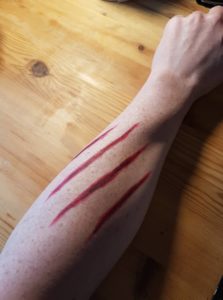 Now take the eyeliner and darken the red stripes. Do not apply too much pressure. You don’t want to create black bars, but rather give the stripes more depth and structure. Therefore, only darken the middle of the red lines and leave the edges and tips red. You can and should work a little irregularly, this gives the whole thing more structure and looks more real.
Step 3: Blood!
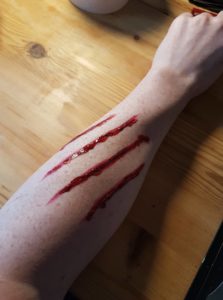 Finally comes the fake blood. There’s not much to say here: Drip and spread the fake blood along the claw marks. The fake blood can be smudged and spill over the edges of the wounds. Depending on how liquid the blood is, it will run a little itself – that’s great!
Did you get fake blood on your fingers during make-up? Then go ahead and wipe along a wound to create the impression that your character has touched their own blood and accidentally spread it.
Conclusion: Claw marks to go
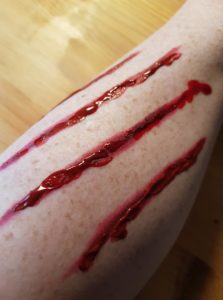 As you can see, the result is not cinematic, but a very good middle ground during a session. Such made-up claw marks help others to properly address the injury, and at the same time you are not kept away from the game for long.
If you start a game already with such marks, you will of course have more time to make up beforehand. For this I have written a second tutorial for claw wounds. It is a little more elaborate, but the result looks quite realistic with a little practice.